Description
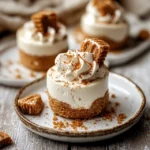
There’s something undeniably magical about a dessert that combines the creamy richness of cheesecake with the spiced, caramel-like flavor of Biscoff cookies. This No-Bake Biscoff Cheesecake is not just a treat for your taste buds, but a dessert that holds a warm, nostalgic charm. Whether you’re serving this for a cozy family gathering or as the star dessert at a festive dinner, this cheesecake has a way of making everyone swoon.
The best part? There’s no need to turn on the oven! With its silky texture and bold flavor, this no-bake cheesecake comes together effortlessly, making it perfect for busy days or when you want to impress your guests without breaking a sweat. And let’s not forget about the indulgent Biscoff cookie crust and the luscious cookie butter swirl on top – it’s the ultimate combination of creamy, crunchy, and indulgent.
I first fell in love with Biscoff cookies on a long-haul flight, where they were served with a cup of coffee. One bite, and I was hooked. Fast forward to today, and I’ve found countless ways to use them in desserts – but this cheesecake is hands-down my favorite. It’s a dessert that feels fancy enough for special occasions yet simple enough for any day you want to treat yourself.
Ingredients
For the crust:
- 1 ½ cups Biscoff cookies, crushed (about 22 cookies)
- 6 tablespoons unsalted butter, melted
For the filling:
- 16 oz cream cheese, softened
- 1 cup powdered sugar
- 1 cup heavy whipping cream
- 1 cup Biscoff cookie butter (melted slightly for easy mixing)
- 1 teaspoon vanilla extract
For the topping:
- ½ cup Biscoff cookie butter, melted
- Crushed Biscoff cookies for garnish
Instructions
Step 1: Prepare the Crust
Start by crushing the Biscoff cookies into fine crumbs. You can do this by pulsing them in a food processor or placing them in a zip-top bag and rolling over them with a rolling pin. Once they’re crushed, mix the crumbs with the melted butter until the texture resembles wet sand.
Press the mixture into the bottom of a 9-inch springform pan. Use the back of a spoon or the bottom of a glass to press it down firmly and evenly. Pop the crust into the fridge to set while you prepare the filling.
Step 2: Whip Up the Cheesecake Filling
In a large mixing bowl, beat the cream cheese until it’s smooth and fluffy. Gradually add in the powdered sugar, continuing to mix until well combined. Stir in the vanilla extract for an extra layer of flavor.
Next, in a separate bowl, whip the heavy cream until stiff peaks form. Gently fold the whipped cream into the cream cheese mixture, being careful not to deflate the airy texture.
Now it’s time for the star ingredient – Biscoff cookie butter. Warm it slightly in the microwave (about 15-20 seconds) to make it easier to mix. Fold the melted cookie butter into the cream cheese mixture until fully incorporated. You should have a luscious, creamy filling with that signature spiced Biscoff flavor.
Step 3: Assemble the Cheesecake
Pour the cheesecake filling over the prepared crust, spreading it out evenly with a spatula. For the topping, drizzle the melted cookie butter over the filling. Use a toothpick or the back of a spoon to create a beautiful swirl pattern. Sprinkle crushed Biscoff cookies on top for added texture and flavor.
Step 4: Chill and Serve
Refrigerate the cheesecake for at least 6 hours, or ideally overnight, to allow it to fully set. When you’re ready to serve, carefully remove the sides of the springform pan. Slice and serve chilled, enjoying each creamy, spiced bite.
Notes
- Store leftovers in an airtight container in the fridge for up to 5 days.
- For a fun twist, try making mini cheesecakes in individual ramekins or jars.
