Description
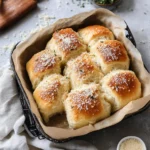
There’s something magical about the simple act of baking bread. The anticipation as the dough rises, the warmth radiating from the oven, and the irresistible aroma of garlic and butter filling your kitchen make it an experience like no other. Garlic Parmesan Pull-Apart Rolls are not just a side dish; they’re a showstopper that transforms any meal into a celebration.
Whether you’re hosting a holiday dinner, looking to impress at a potluck, or simply want to elevate your family supper, these rolls are a must-try. With their soft, pillowy texture and a savory coating of garlic butter and Parmesan, they strike the perfect balance between indulgence and comfort. Imagine everyone at the table pulling apart a piece, the buttery layers separating easily, releasing a fragrant steam. It’s the kind of dish that turns an ordinary meal into a moment to savor.
What makes these rolls truly stand out is the communal aspect of serving them. Each person pulling apart their own roll adds an element of fun to the meal, and it’s impossible not to smile as you watch the rolls disappear one by one. They’re a conversation starter, a comfort food, and a delight for all ages
Ingredients
For the Dough
- 4 to 5 cups all-purpose flour
- 1/3 cup granulated sugar
- 2 packets (4 1/2 teaspoons) instant yeast
- 1 1/2 teaspoons salt
- 3/4 cup milk
- 3/4 cup water
- 1/4 cup unsalted butter
- 1 large egg
For the Garlic Parmesan Topping
- 1/4 cup unsalted butter, melted
- 3 cloves garlic, minced
- 1/2 cup finely grated Parmesan cheese
Instructions
Step 1: Prepare the Dough
Begin by mixing 2 cups of flour, sugar, yeast, and salt in a large mixing bowl. In a small saucepan, combine the milk, water, and butter, and heat until very warm (120°F to 130°F). The butter doesn’t need to melt entirely.
Pour the warm liquid into the dry ingredients and add the egg. Beat on medium speed for 2 minutes, scraping down the sides of the bowl occasionally. Gradually add enough of the remaining flour, 1/2 cup at a time, to form a soft, slightly sticky dough.
Step 2: Knead the Dough
Turn the dough out onto a floured surface and knead it for about 8 to 10 minutes until it becomes smooth and elastic. You’ll know it’s ready when it springs back slightly when pressed.
Place the dough in a greased bowl, turning it once to coat the surface. Cover the bowl with a clean kitchen towel and let the dough rise in a warm, draft-free spot until doubled in size, about 1 hour.
Step 3: Shape the Rolls
Punch down the risen dough to release any air bubbles. Divide it into 20 equal pieces using a sharp knife or dough scraper. Roll each piece into a smooth ball by tucking the edges underneath and pinching them at the bottom.
Step 4: Add the Garlic Parmesan Topping
In a small bowl, mix melted butter with minced garlic. Dip each dough ball into the garlic butter, ensuring it’s evenly coated. Roll the buttered dough ball in grated Parmesan cheese for an extra layer of flavor.
Arrange the balls in a greased 9×13-inch baking dish, placing them close together but not touching. Cover the pan and let the rolls rise for another 30 minutes, or until doubled in size.
Step 5: Bake the Rolls
Preheat your oven to 375°F (190°C). Bake the rolls for 25 to 30 minutes, or until golden brown and fragrant. Keep an eye on them in the last few minutes to prevent over-browning.
Step 6: Finish and Serve
Remove the rolls from the oven and brush with any remaining garlic butter for a glossy finish. Allow them to cool slightly before serving.
Notes
- Customizing Flavors: You can add chopped fresh herbs like rosemary or thyme to the garlic butter for an extra burst of flavor.
- Cheese Variations: While Parmesan is a classic choice, you can experiment with other hard cheeses like Asiago or Pecorino Romano for a slightly different taste.
- Dough Texture: If the dough feels too sticky during kneading, sprinkle in flour gradually. Avoid adding too much to maintain the soft texture.
- Serving Suggestions: These rolls pair beautifully with hearty soups, pasta dishes, or roasted meats. They also shine on their own as a snack or appetizer.
- Reheating Tip: For best results, reheat leftover rolls in the oven rather than the microwave to maintain their fluffy texture and crispy edges.