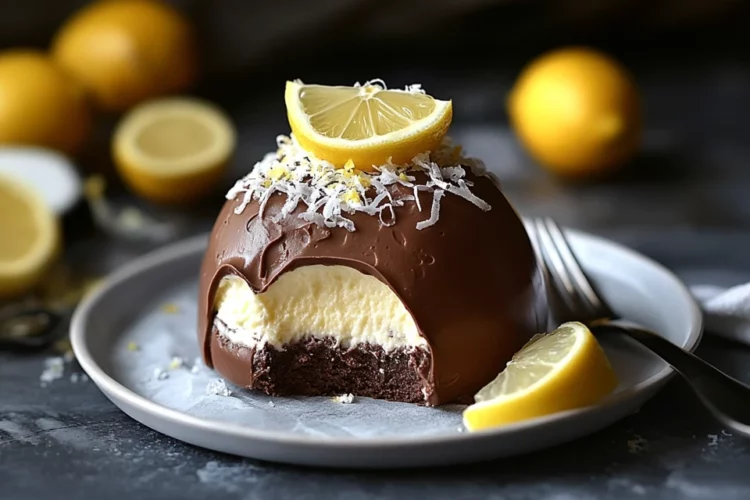
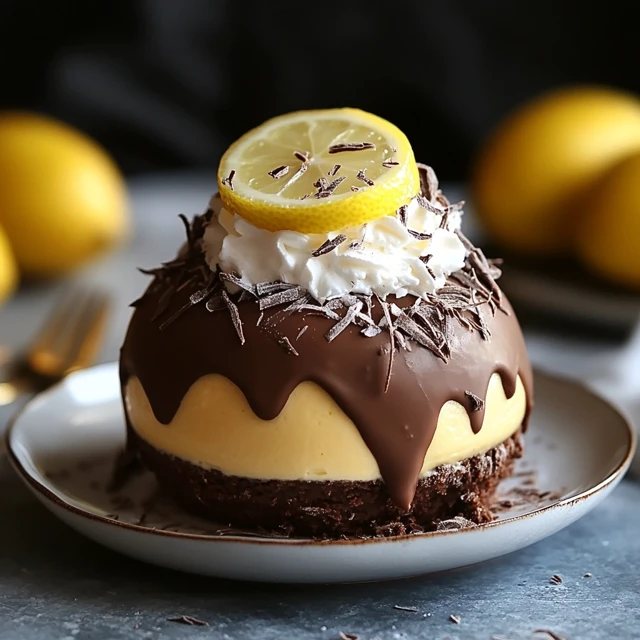
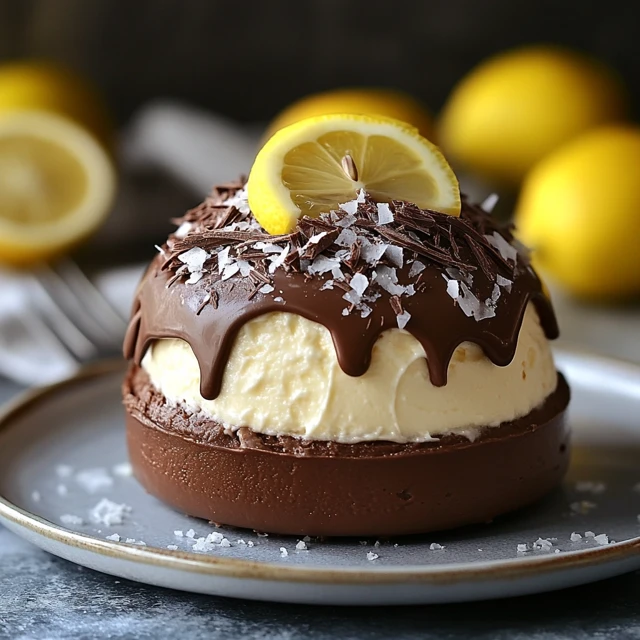
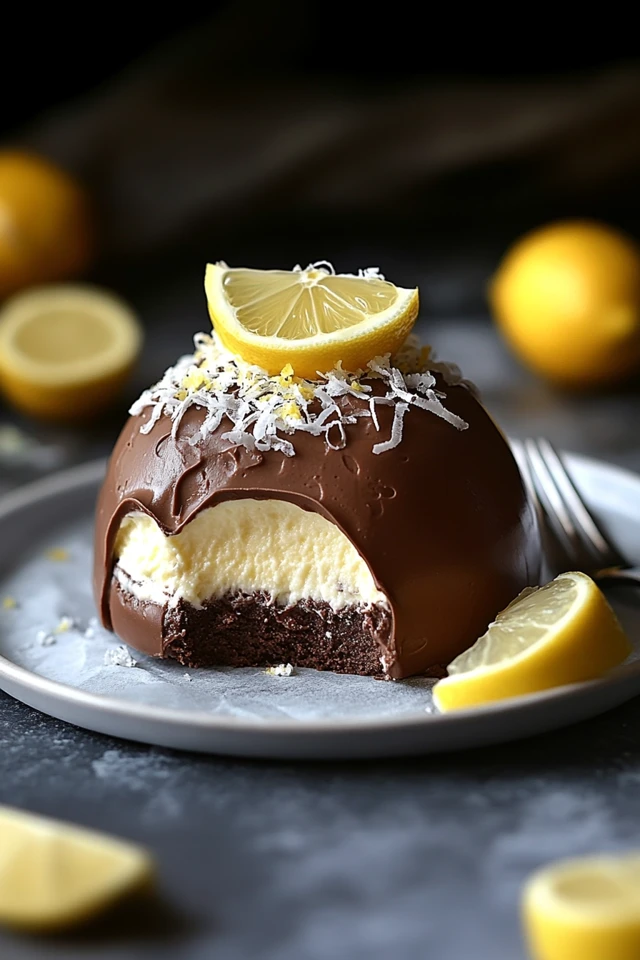
There’s something truly magical about desserts that feel almost too pretty to eat. I still remember the first time I encountered a mousse dome — it was at a little bakery tucked away on a rainy afternoon walk. The delicate, glossy shell caught my eye immediately, and when I finally took that first bite, it was pure bliss. The richness of chocolate mingled with a bright citrusy zing of lemon, and I knew right then that this was a dessert worth learning to make at home.

Chocolate and lemon might not be the most obvious pairing, but somehow, they create a perfect balance — rich and refreshing all at once. It’s a combination that’s celebrated in European patisseries, especially during spring and summer when citrus is at its peak. Making these domes at home transforms any ordinary day into something a little more special, and they’re surprisingly achievable once you break it down step-by-step. Plus, who doesn’t love the wide-eyed wonder on people’s faces when you serve them something so beautiful?
Whether you’re crafting these for a fancy dinner party, a birthday celebration, or just because you need a little edible art therapy, this Chocolate Lemon Mousse Dome is sure to impress — and delight!
Why You’ll Love This Recipe:
- The bright, zesty lemon mousse is the perfect contrast to the rich, smooth chocolate shell.
- They look super impressive but are surprisingly simple once you follow the steps.
- You can make them ahead of time, making them a stress-free option for gatherings.
- They’re light enough to enjoy even after a hearty meal.
- Each bite feels like a luxurious little moment of joy.
INGREDIENTS YOU’LL NEED:
For the Lemon Mousse:
- 4 egg yolks
- 120g granulated sugar
- 120ml lemon juice
- Zest of 1 lemon
- 6g gelatin powder
- 300ml heavy cream
For the Chocolate Shell:
- 300g dark chocolate (good quality)
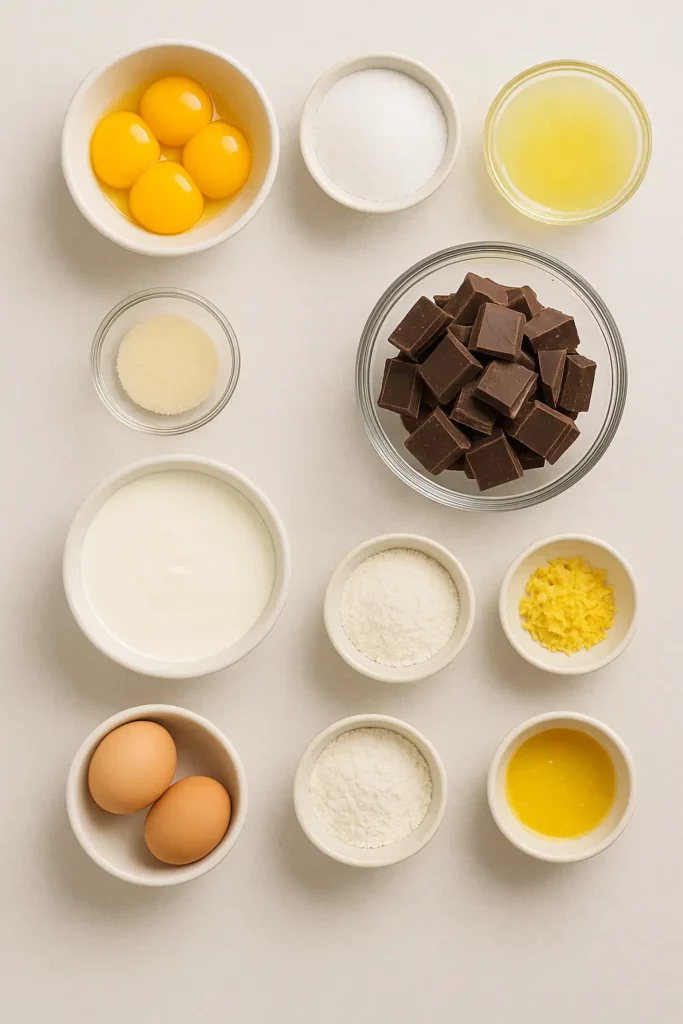
For the Chocolate Sponge Base:
- 2 eggs
- 60g granulated sugar
- 40g all-purpose flour
- 20g cocoa powder
- 30g unsalted butter, melted
HOW TO MAKE Chocolate Lemon Mousse Dome:
STEP-BY-STEP INSTRUCTIONS:
Step 1: Prepare the Chocolate Sponge Base Let’s start by making the foundation for our domes. Preheat your oven to 180°C (350°F).
In a bowl, whisk the eggs and sugar until light and fluffy. It should look pale and airy — this is what gives our sponge its delicate texture.
Sift in the flour and cocoa powder, folding gently so you don’t lose that beautiful volume. Drizzle in the melted butter and fold again until just combined. Pour the batter into a lined baking tray, spreading it out evenly.
Bake for about 8-10 minutes. You’ll know it’s ready when it springs back lightly under your touch. Let it cool completely, then cut out circles that will fit neatly at the base of your dome molds.
Step 2: Make the Lemon Mousse Next, let’s whip up the star of the show. In a saucepan, combine the egg yolks, sugar, lemon juice, and lemon zest. Cook over low heat, stirring constantly — think slow and patient — until the mixture thickens into a lovely, glossy curd.
While that’s happening, bloom the gelatin by sprinkling it over a little cold water. Once the curd is ready, stir in the gelatin until fully dissolved. Allow the mixture to cool to room temperature.
In a separate bowl, whip the heavy cream until it forms soft peaks. Gently fold the cream into the cooled lemon curd. It should be airy, light, and full of promise.

Step 3: Assemble the Domes Fill your dome molds halfway with the lemon mousse. Gently press one of your sponge circles on top, sealing it in. Freeze for at least 4 hours, or ideally overnight, so they become firm enough to handle.
Step 4: Prepare the Chocolate Shell Melt the dark chocolate carefully — you can use a microwave in short bursts or a double boiler for more control. You want it smooth and shiny.
Unmold your frozen mousse domes and place them on a wire rack. Pour the melted chocolate over the domes, letting it cascade down and coat them completely. The chocolate will harden almost instantly thanks to the frozen mousse inside.
Step 5: Final Touches Let the domes thaw slightly in the fridge for about an hour before serving. This way, the mousse will be creamy and luscious when you cut into it.
HELPFUL TIPS:
- When folding the whipped cream into the lemon curd, be gentle — you want to keep as much air as possible for that cloud-like mousse.
- If your chocolate starts to cool and thicken while pouring, gently rewarm it so it flows smoothly.
- A small ladle or spoon can help you control the chocolate pour to make sure the domes get an even coating.
- Use a silicone dome mold if you can — it makes unmolding a breeze without any cracks.
DETAILS:
- Prep Time: 30 minutes + chilling time
- Cook Time: 10 minutes
- Total Time: 5 hours (including freezing)
- Yield: 6 domes
- Category: Dessert
- Method: Baking and Freezing
- Cuisine: European-Inspired
- Diet: Vegetarian
NOTES:
- You can swap dark chocolate for milk chocolate if you prefer something sweeter.
- For an extra zing, add a tiny bit more lemon zest into the mousse.
- These domes freeze really well — just store them in an airtight container and coat with chocolate when you’re ready to serve.

NUTRITIONAL INFORMATION:
(Per dome — approximate)
- Calories: 380
- Fat: 24g
- Carbohydrates: 36g
- Protein: 6g
- Sugar: 27g
FREQUENTLY ASKED QUESTIONS:
Can I make these domes ahead of time?
Absolutely! These domes are perfect for making ahead since they need freezing time. Just wait to pour the chocolate until closer to serving so you get that fresh, glossy look.
What if I don’t have a dome mold?
No worries! You can use small bowls lined with plastic wrap for an easy DIY mold. They won’t be perfectly round but will still taste heavenly.
Can I use white chocolate for the shell?
Yes! White chocolate would pair beautifully with the lemon mousse, giving it a lighter look and a sweeter flavor.
STORAGE INSTRUCTIONS:
- Store finished domes in the fridge for up to 2 days.
- If uncoated with chocolate, frozen domes can be kept in the freezer for up to a month.
- Always store in an airtight container to prevent freezer burn or fridge odors.
Related Recipes
If you liked this recipe, you’ll definitely enjoy these other delights:
- Gooey Coffee Caramel Cake
- Raspberry Cheesecake Bites with Chocolate Crust
- Biscoff Truffles
- Peanut Butter Cup Dump Cake
CONCLUSION
Making these Chocolate Lemon Mousse Domes might feel like you’re crafting little works of art — and honestly, you are. Each step, from whipping the lemon mousse to pouring that glossy chocolate shell, feels a little like a mini celebration. And when you finally sit down to enjoy one, fork sinking through silky mousse and tender sponge, you’ll know it was all so worth it. These domes aren’t just desserts — they’re an experience. So go ahead, channel your inner pastry chef, and create something truly unforgettable!
Print
Chocolate Lemon Mousse Dome
Description
There’s something truly magical about desserts that feel almost too pretty to eat. I still remember the first time I encountered a mousse dome — it was at a little bakery tucked away on a rainy afternoon walk. The delicate, glossy shell caught my eye immediately, and when I finally took that first bite, it was pure bliss. The richness of chocolate mingled with a bright citrusy zing of lemon, and I knew right then that this was a dessert worth learning to make at home.
Chocolate and lemon might not be the most obvious pairing, but somehow, they create a perfect balance — rich and refreshing all at once. It’s a combination that’s celebrated in European patisseries, especially during spring and summer when citrus is at its peak. Making these domes at home transforms any ordinary day into something a little more special, and they’re surprisingly achievable once you break it down step-by-step. Plus, who doesn’t love the wide-eyed wonder on people’s faces when you serve them something so beautiful?
Whether you’re crafting these for a fancy dinner party, a birthday celebration, or just because you need a little edible art therapy, this Chocolate Lemon Mousse Dome is sure to impress — and delight!
Ingredients
For the Lemon Mousse:
4 egg yolks
120g granulated sugar
120ml lemon juice
Zest of 1 lemon
6g gelatin powder
300ml heavy cream
For the Chocolate Shell:
300g dark chocolate (good quality)
For the Chocolate Sponge Base:
2 eggs
60g granulated sugar
40g allpurpose flour
20g cocoa powder
30g unsalted butter, melted
Instructions
Step 1: Prepare the Chocolate Sponge Base Let’s start by making the foundation for our domes. Preheat your oven to 180°C (350°F).
In a bowl, whisk the eggs and sugar until light and fluffy. It should look pale and airy — this is what gives our sponge its delicate texture.
Sift in the flour and cocoa powder, folding gently so you don’t lose that beautiful volume. Drizzle in the melted butter and fold again until just combined. Pour the batter into a lined baking tray, spreading it out evenly.
Bake for about 8-10 minutes. You’ll know it’s ready when it springs back lightly under your touch. Let it cool completely, then cut out circles that will fit neatly at the base of your dome molds.
Step 2: Make the Lemon Mousse Next, let’s whip up the star of the show. In a saucepan, combine the egg yolks, sugar, lemon juice, and lemon zest. Cook over low heat, stirring constantly — think slow and patient — until the mixture thickens into a lovely, glossy curd.
While that’s happening, bloom the gelatin by sprinkling it over a little cold water. Once the curd is ready, stir in the gelatin until fully dissolved. Allow the mixture to cool to room temperature.
In a separate bowl, whip the heavy cream until it forms soft peaks. Gently fold the cream into the cooled lemon curd. It should be airy, light, and full of promise.
Step 3: Assemble the Domes Fill your dome molds halfway with the lemon mousse. Gently press one of your sponge circles on top, sealing it in. Freeze for at least 4 hours, or ideally overnight, so they become firm enough to handle.
Step 4: Prepare the Chocolate Shell Melt the dark chocolate carefully — you can use a microwave in short bursts or a double boiler for more control. You want it smooth and shiny.
Unmold your frozen mousse domes and place them on a wire rack. Pour the melted chocolate over the domes, letting it cascade down and coat them completely. The chocolate will harden almost instantly thanks to the frozen mousse inside.
Step 5: Final Touches Let the domes thaw slightly in the fridge for about an hour before serving. This way, the mousse will be creamy and luscious when you cut into it.
Notes
-
You can swap dark chocolate for milk chocolate if you prefer something sweeter.
-
For an extra zing, add a tiny bit more lemon zest into the mousse.
-
These domes freeze really well — just store them in an airtight container and coat with chocolate when you’re ready to serve.