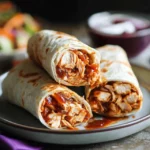
Description
There’s something undeniably satisfying about a warm, crispy wrap filled with smoky barbecue chicken, gooey melted cheese, and fresh veggies. These Crispy BBQ Chicken Wraps are a perfect blend of crunch, savory goodness, and a hint of sweetness from the barbecue sauce. They’re quick to make, customizable, and a great go-to for lunch, dinner, or even a game-day snack.
Growing up, wraps were always a staple in our home. Whether it was a rushed school morning or a lazy weekend lunch, we loved creating different variations. This particular wrap, with its crispy golden tortilla and the irresistible combination of flavors, became a favorite. It’s everything you love about barbecue chicken in a convenient handheld meal!
If you’re looking for a recipe that’s easy to throw together with ingredients you probably already have, this one is a must-try. Plus, it’s kid-friendly, meal-prep friendly, and completely customizable to suit your taste.
Ingredients
- 2 cups cooked chicken, shredded
- ½ cup barbecue sauce
- 1 cup shredded cheddar cheese
- ½ cup shredded mozzarella cheese
- 1 cup chopped lettuce
- ½ cup diced tomatoes
- ¼ cup diced red onion
- 4 large flour tortillas
- 2 tablespoons butter, melted
Instructions
Start by mixing your shredded chicken with barbecue sauce in a bowl. You want every piece to be coated in that smoky-sweet goodness. If your chicken is cold, you can warm it up slightly in the microwave or on the stovetop for an even better texture inside the wrap.
Lay out a large flour tortilla and sprinkle a generous amount of cheddar and mozzarella cheese in the center. Next, spoon some of the BBQ chicken mixture on top of the cheese. Then, add a handful of lettuce, diced tomatoes, and red onion for a fresh contrast to the rich filling.
To keep everything snug inside, fold in the sides of the tortilla first, then roll it up tightly from the bottom like a burrito. Make sure to tuck in the filling as you roll to prevent anything from falling out while cooking.
Brush the melted butter onto the outside of each wrap. This step is key for getting that golden, crispy exterior. Heat a large skillet or griddle over medium heat and place the wraps seam-side down. Cook for 2-3 minutes per side, pressing down slightly, until they are beautifully golden brown and crispy.
Once your wraps are crisp and hot, remove them from the skillet and let them cool for a minute before slicing in half. Serve with extra barbecue sauce for dipping, or pair them with a simple side salad or fries for a complete meal.
Notes
- These wraps taste amazing fresh, but you can store leftovers for later. Keep them in an airtight container in the fridge for up to 3 days and reheat in a skillet for the best texture.
- Want a lower-carb option? Use a low-carb tortilla or wrap the filling in a lettuce leaf instead.