
There’s something timeless and magical about a pie cooling on the windowsill, its buttery scent mingling with the fresh air. Growing up, pie always meant celebration in my family – whether it was a holiday, a special Sunday dinner, or just a regular Tuesday that needed a little extra sweetness. But Salted Honey Pie feels even more special. It’s simple, yet it holds a sort of rustic elegance that transports you back to simpler times.

Originating from the classic tradition of southern baking, this pie is like a cousin to the well-loved chess pie, but with a rich twist of honey and just a kiss of salt to balance the sweetness. It feels right at home during springtime gatherings, autumn potlucks, and even cozy winter evenings when you just want something a little different from the usual chocolate or fruit-filled desserts.
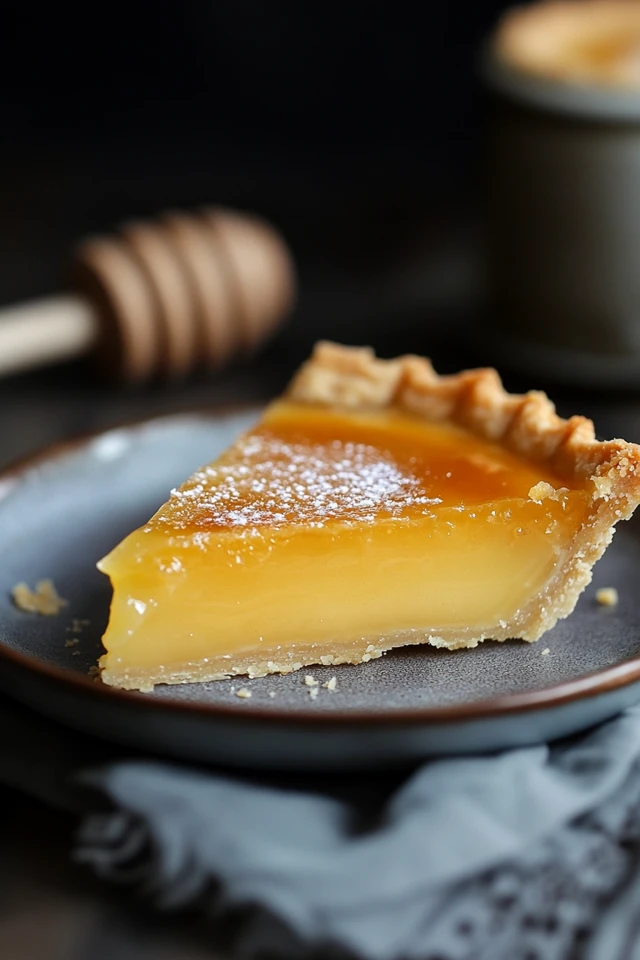
The golden, custardy filling is silky smooth, cradled by a flaky, buttery crust that shatters into delicate crumbs with each bite. And that finishing sprinkle of sea salt? Pure magic. It brings out the deep floral notes of the honey and makes every mouthful downright irresistible. If you’ve never tried Salted Honey Pie before, get ready for a new favorite that feels like a warm hug in dessert form.

Why You’ll Love This Recipe:
- Sweet, salty, and perfectly balanced flavors
- Simple ingredients you probably already have at home
- A gorgeous, glossy pie that looks impressive but is easy to make
- Perfect for any season and any occasion
- The custardy texture is melt-in-your-mouth delicious
INGREDIENTS YOU’LL NEED:
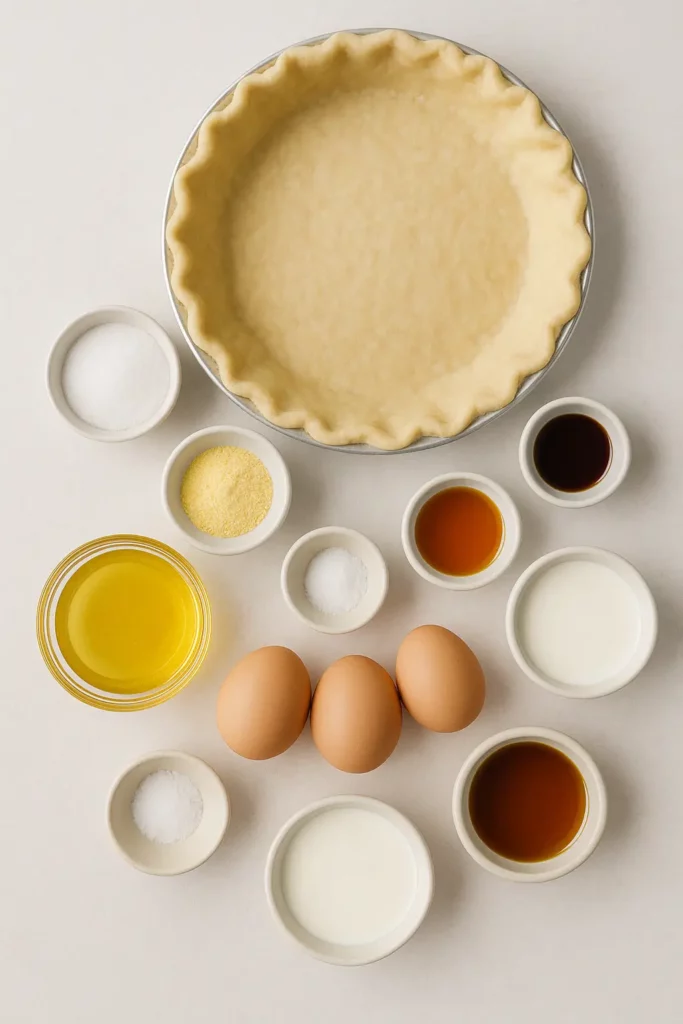
- 1 pie crust (homemade or store-bought)
- 1/2 cup unsalted butter, melted
- 3/4 cup granulated sugar
- 2 tablespoons cornmeal
- 1/4 teaspoon salt
- 1 tablespoon white vinegar
- 1 teaspoon vanilla extract
- 3/4 cup honey
- 3 large eggs
- 1/2 cup heavy cream
- Flaky sea salt, for topping
HOW TO MAKE SALTED HONEY PIE:
STEP-BY-STEP INSTRUCTIONS:
Step 1: Preheat and Prepare
Start by preheating your oven to 350°F (176°C). Roll out your pie crust and carefully fit it into a 9-inch pie dish. Crimp the edges however your heart desires – rustic and imperfect always looks charming.
Step 2: Whisk Together the Good Stuff
In a large bowl, whisk together the melted butter, sugar, cornmeal, and salt. It’ll look a little grainy at this point, and that’s totally fine. Stir in the vinegar and vanilla extract.
Step 3: Honey Time
Pour in that beautiful, golden honey. Take a moment to appreciate how it ribbons into the bowl like liquid sunshine. Then add the eggs one at a time, whisking gently to combine.

Step 4: Add the Creamy Touch
Stir in the heavy cream until the mixture is smooth and luscious. This is where you’ll start to see that silky custard base come together.
Step 5: Assemble and Bake
Pour the filling into your prepared pie crust. Use a spatula to smooth out the top if needed. Carefully transfer the pie to the oven and bake for about 40 to 50 minutes. You’re looking for the edges to be set but the center to still have a little jiggle – like the wobble of a just-set cheesecake.
Step 6: Cool and Finish
Let the pie cool completely before slicing. Right before serving, sprinkle the top generously with flaky sea salt. That final touch is what makes the flavors sing.
HELPFUL TIPS:
- Crust Shield: If the edges of your crust start browning too quickly, cover them with a pie shield or some foil to prevent burning.
- Honey Choice: Choose a good-quality honey since its flavor shines in this pie. Clover, wildflower, or orange blossom honeys are all wonderful options.
- Cool Completely: It’s tempting to slice right in, but letting the pie cool ensures clean slices and the perfect custardy texture.
- Room Temp Ingredients: Using room-temperature eggs and cream helps the filling mix smoothly without clumping.

DETAILS:
- Prep Time: 20 minutes
- Cook Time: 45 minutes
- Total Time: 1 hour 5 minutes
- Yield: 8 slices
- Category: Dessert
- Method: Baking
- Cuisine: American, Southern
- Diet: Vegetarian
NOTES:
This pie can be made a day ahead – in fact, it tastes even better after sitting overnight. Just keep it loosely covered at room temperature.
If you prefer a deeper, more caramel-like flavor, you can let the pie bake a minute or two longer for a slightly darker finish, but watch closely to prevent over-browning.

NUTRITIONAL INFORMATION:
(Per Slice – based on 8 slices)
- Calories: 420
- Fat: 22g
- Saturated Fat: 13g
- Carbohydrates: 55g
- Sugar: 42g
- Protein: 4g
- Fiber: 0g
- Sodium: 180mg
FREQUENTLY ASKED QUESTIONS:
Can I use store-bought crust?
Absolutely! A good store-bought crust saves time and still tastes delicious.
How long does Salted Honey Pie last?
It stays fresh for up to 3 days at room temperature, or up to 5 days in the fridge.
Can I freeze Salted Honey Pie?
Yes, you can freeze it! Wrap it tightly in plastic wrap and foil, and freeze for up to 2 months. Thaw overnight in the fridge before serving.
Is this pie overly sweet?
Thanks to the touch of vinegar and that lovely sprinkle of sea salt, it’s sweet but beautifully balanced – not cloying at all.
STORAGE INSTRUCTIONS:
Store the pie covered at room temperature for up to 3 days, or refrigerate it for up to 5 days. Bring it to room temperature before serving for the best texture.
Related Recipes
If you liked this recipe, you’ll definitely enjoy these other cozy desserts:
- Honey Babka with Cream Cheese Frosting
- Chocolate Macaroon Tart
- Decadent Cottage Cheese Salted Caramel Ice Cream
- Honey Peach Cream Cheese Cupcakes – Sweet, Fruity, and Lusciously Creamy!
Conclusion
Salted Honey Pie is one of those rare treats that feels both nostalgic and new all at once. Its silky texture, balanced sweetness, and hint of salt make it an unforgettable dessert that you’ll find yourself craving again and again. Whether you’re making it for a family gathering or just because you want to treat yourself, this pie is pure comfort in every slice. So grab your apron, pick out your favorite honey, and get ready to fall in love with a new favorite.
Print
Salted Honey Pie
Description
There’s something timeless and magical about a pie cooling on the windowsill, its buttery scent mingling with the fresh air. Growing up, pie always meant celebration in my family – whether it was a holiday, a special Sunday dinner, or just a regular Tuesday that needed a little extra sweetness. But Salted Honey Pie feels even more special. It’s simple, yet it holds a sort of rustic elegance that transports you back to simpler times.
Originating from the classic tradition of southern baking, this pie is like a cousin to the well-loved chess pie, but with a rich twist of honey and just a kiss of salt to balance the sweetness. It feels right at home during springtime gatherings, autumn potlucks, and even cozy winter evenings when you just want something a little different from the usual chocolate or fruit-filled desserts.
The golden, custardy filling is silky smooth, cradled by a flaky, buttery crust that shatters into delicate crumbs with each bite. And that finishing sprinkle of sea salt? Pure magic. It brings out the deep floral notes of the honey and makes every mouthful downright irresistible. If you’ve never tried Salted Honey Pie before, get ready for a new favorite that feels like a warm hug in dessert form.
Ingredients
1 pie crust (homemade or store-bought)
1/2 cup unsalted butter, melted
3/4 cup granulated sugar
2 tablespoons cornmeal
1/4 teaspoon salt
1 tablespoon white vinegar
1 teaspoon vanilla extract
3/4 cup honey
3 large eggs
1/2 cup heavy cream
Flaky sea salt, for topping
Instructions
Step 1: Preheat and Prepare
Start by preheating your oven to 350°F (176°C). Roll out your pie crust and carefully fit it into a 9-inch pie dish. Crimp the edges however your heart desires – rustic and imperfect always looks charming.
Step 2: Whisk Together the Good Stuff
In a large bowl, whisk together the melted butter, sugar, cornmeal, and salt. It’ll look a little grainy at this point, and that’s totally fine. Stir in the vinegar and vanilla extract.
Step 3: Honey Time
Pour in that beautiful, golden honey. Take a moment to appreciate how it ribbons into the bowl like liquid sunshine. Then add the eggs one at a time, whisking gently to combine.
Step 4: Add the Creamy Touch
Stir in the heavy cream until the mixture is smooth and luscious. This is where you’ll start to see that silky custard base come together.
Step 5: Assemble and Bake
Pour the filling into your prepared pie crust. Use a spatula to smooth out the top if needed. Carefully transfer the pie to the oven and bake for about 40 to 50 minutes. You’re looking for the edges to be set but the center to still have a little jiggle – like the wobble of a just-set cheesecake.
Step 6: Cool and Finish
Let the pie cool completely before slicing. Right before serving, sprinkle the top generously with flaky sea salt. That final touch is what makes the flavors sing.
Notes
This pie can be made a day ahead – in fact, it tastes even better after sitting overnight. Just keep it loosely covered at room temperature.
If you prefer a deeper, more caramel-like flavor, you can let the pie bake a minute or two longer for a slightly darker finish, but watch closely to prevent over-browning.